Roofing installation is a big job that takes time to complete. You must hire reputable Johns Creek Roofers with experience in your chosen roofing materials. Ensure the contract has a 72-hour right to cancel, escrow, start and completion dates, payment schedule, warranties, and specifications. You should also check for dump fees.
A roof is one of the most visible elements of a home and can make or break its appearance. Upgrading the roofing material can greatly improve a house’s overall appeal. But before deciding on what materials to use, you should consider the environmental conditions of your area. This will help you decide on a roofing material that can resist the harsh weather conditions of your region.
Asphalt shingles are the most common residential roofing material in the United States. They are lightweight, affordable and easy to install. They can withstand severe weather conditions and are warranted for 20 to 25 years. However, this type of shingle is not good for cold climates.
Tile roofing adds texture and elegance to your home’s exterior. Genuine clay or concrete tiles are long-lasting and noncombustible, but they can be expensive. A less expensive alternative is fiberglass or cementitious tiles that look similar to their genuine counterparts.
Metal roofing is another option. Galvanized iron, aluminum and terne plate are the most commonly used metals. Metal panels are soldered or welded together and are best for flat roofs. They are also designed to respond to thermal movement.
Membrane roofing is made from EPDM (ethylene propylene diene monomer), PVC (polyvinyl chloride) or other synthetic rubber. It is usually reinforced with fabric or coated with mineral granules. It can be loose laid or mechanically fastened to nailable or nonnailable decks. It is highly resistant to degradation from chemicals, ozone and ultraviolet radiation.
Underlayment
While much attention is given to the type of shingles, tiles, metal or other roof-covering material to be used, underlayment — which protects the roof deck before the actual roof-covering materials are installed — is just as important. The underlayment acts as a secondary barrier against leakage and moisture intrusion, providing protection between the roof deck and the final roof-covering material. In areas that are more prone to leakage or water intrusion, underlayment may be made of waterproof materials.
Underlayment is typically constructed of felt or a similar material, and it can be fastened to the roof deck using staples or plastic caps. Felt underlayment is often referred to as roofing felt, and it is available in many different thicknesses and grades. For example, thirty-pound felt is more resistant to tearing and damage caused during roof installation, which means that it will protect the roof deck longer. In high-wind areas, it may be advisable to use underlayment fastened with plastic caps instead of staples because they offer better resistance to wind damage.
Felt underlayment must be inspected regularly and repaired where necessary, particularly in areas where moisture can cause problems such as water leaks or condensation. It should also be inspected for signs of wear and tear, such as holes from a nail gun. In addition, it should be re-fastened to the roof deck as needed.
Another option for underlayment is a synthetic peel-and-stick membrane product, which usually includes a rubberized asphalt or butyl-based adhesive that’s mounted on a polyethylene carrier sheet. This type of underlayment offers some advantages over felt underlayment, including superior performance in low-temperature environments and greater flexibility on uneven surfaces. However, it can be difficult to install correctly. Like all roofing materials, it is essential that underlayment is installed in accordance with OSHA and other workplace safety standards. Workers should be equipped with fall protection devices and work shoes designed for traction on roofs.
Shingles
Once the sheathing and underlayment are in place, it’s time to start laying shingles. The process is a little different for every roofer, but most follow the same basic approach. First, lay a course of starter shingles that are designed for that purpose. These shingles are thicker than standard shingles, and their tabs overlap the shingle courses above them by about half an inch. Nail these shingles in a grid pattern, using four roofing nails per shingle as recommended by the manufacturer and extending the nails out over the eaves by about half an inch.
Next, install a piece of aluminum drip edge that is designed to protect the fascia board. It should sit flush with the bottom of the fascia board, with a half-inch gap between it and the gutter. A drip edge is especially important in cold climates, where ice can build up behind the membrane and shingle layers, and create an interior drip.
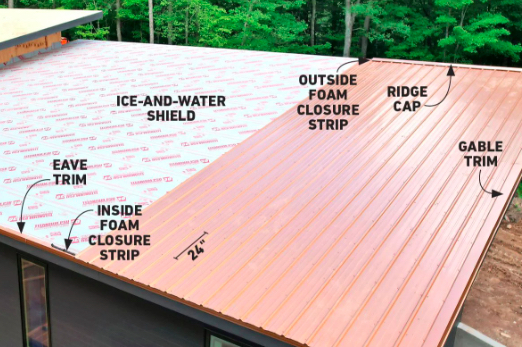
If you live in a particularly snowy area, it’s a good idea to install an ice and water barrier that is applied to the underside of all the shingle layers. This type of membrane can prevent ice dams from forming on the slopes of the roof, and help keep water shed properly.
Finally, it’s time to finish the roof with a cap of ridge and hip shingles. This step is a bit trickier, as the shingles must be bent to straddle the peak and shed water down either slope. This is usually done by hand with a shingle bender, and the result should be a clean, sharp peak that resists wind uplift. Also, the ridge should be flashed with metal step flashing that is at least 125 mm high and 125 mm wide (5”’ high and 5” wide). This helps prevent leaks around plumbing stacks and vents.
Flashing
A roof needs flashing to prevent water leaks and direct the flow of rainwater into walls. It is made of a flat, thin material and placed at important junctions where building materials intersect. These include roof hips and valleys, joints between the wall and the roof, and where the roof intersects with projections like chimneys, vent pipes, window openings, etc.
Flashing is a vital part of any roofing system, but it’s often overlooked or poorly or incorrectly installed during roof installation. This can lead to premature roof deterioration, water damage, mold and mildew, and pest infestations.
Roofers use several types of flashing depending on the location and extent of water sealing required. The most common type is a continuous piece of metal that carries rainwater down to the shingles below. This is called apron flashing. It’s also possible to use two-part flashing for some features such as chimneys. This allows the two pieces to flex as the home expands and contracts throughout different seasons, which can reduce the likelihood of breaks in the flashing.
Valley flashing is another type of flashing that helps to protect the area where a roof’s slopes meet. It consists of multiple overlapping pieces of flashing that resemble fish scales and is usually made of aluminum, although copper is a better option due to its durability.
Kickout flashing is used in the corners of a roof where the edge of a gable or dormer meets the roof. This bridges the gap between the step flashing and the gutter to keep out water, which can cause rot and other problems. To install it, a roofing professional must cut the metal to fit the shape of the corner, then bend it in a V-shape and fasten it with a nail or screw.
Ventilation
Ventilation is a key element in roof installation and helps extend the life of your roofing system. It also keeps your attic cooler in the summer and lessens the strain on your air conditioning. Without adequate ventilation, your attic can overheat and trap moisture that breeds bad-smelling mildew and mold. This moisture can damage the wood framing and sheathing and cause rot. If it drips onto a ceiling, it can damage the carpet and require expensive professional cleaning or replacement.
To ensure adequate ventilation, your roofing contractor will probably install a mixture of intake and exhaust vents. Exhaust-style vents like ridge and box vents take advantage of natural convection to move hot, stale attic air out of your home. However, they are only half of a good venting strategy. Intake vents in the soffit bring in cool, fresh air to help push the old hot attic air out.
Typically, a roofer will mark the spots for the vents with a nail and then use a saber saw to cut the holes into the attic underlayment and decking. They will then remove the shingles in the area around the marks and apply a flashing sealant to the underside of the vent flange on all sides. Then they will slip the vent flange under the shingles at the upper part of the hole and rest the lower part on top of the shingle.
Some homeowners opt to use turbine vents that include motors to power fans and create updrafts. These are generally used in attics that have low pitch roofs and need more ventilation than a passive system can provide. The installation process for these is similar to that of the static vents.